
Below are step-by-step instructions for configuring your Azure Entra ID (formerly Azure Active Directory) to enable use of Single Sign-On (SSO) when logging into GageList. This method uses OAuth 2.0 and OpenID Connect (OIDC) for authentication and authorization.
There are two methods for setting this up in your Azure tenant:
- Adding GageList to your tenant from the Microsoft Entra application gallery (recommended)
- Setting up GageList as a new registered application in your tenant
Method 1: Adding GageList to your tenant from the Microsoft Entra application gallery (recommended)
Prerequisites
- You need administrative access to your organization’s Azure Entra ID tenant via the Azure Portal (https://portal.azure.com).
- Ensure you have the necessary permissions to register applications and manage user access in your tenant.
- Have an available GageList account for adding users that will be accessing GageList.net.
Step 1: Sign in to the Azure Portal
- Open your web browser and navigate to the Azure Portal: https://portal.azure.com.
- Sign in with your Azure Entra ID administrator credentials (e.g., an account with Global Administrator or Application Administrator privileges).
Step 2: Navigate to Microsoft Entra ID
- In the Azure Portal, locate the left-hand navigation menu.
- Click on Microsoft Entra ID (it might appear as “Azure Active Directory” depending on your portal version).
- If it’s not visible, use the search bar at the top of the portal, type “Microsoft Entra ID,” and select it from the results.
Step 3: Add GageList from the Microsoft Entra Application Gallery
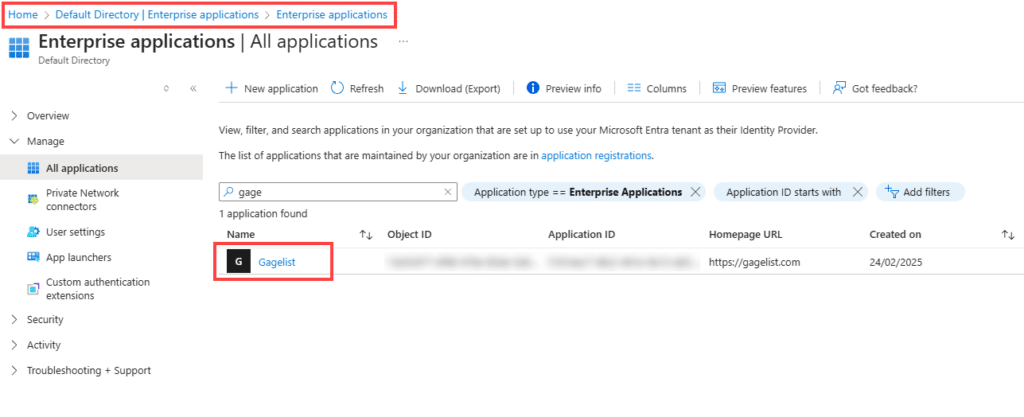
- In the Microsoft Entra ID section, click on Enterprise applications in the left-hand menu.
- Click the + New application button at the top of the page.
- On the Browse Microsoft Entra Gallery page, use the search bar to find “GageList”.
- Once you find GageList, click the tile to select it.
- Click the Create button to add the application to your tenant.
- This will provision the app in your Azure Entra ID tenant and redirect you to its configuration page.
Step 4: Configure Single Sign-On (SSO)
- On the application’s overview page in the Enterprise applications section, locate the left-hand menu and click Single sign-on.
- Select OpenID Connect as the SSO method (it may also appear as “OIDC” or “OpenID Connect-based SSO”).
- You’ll be prompted to configure the SSO settings. Since GageList is available in the application gallery, most settings (like the client ID, issuer URL, and metadata) are pre-populated. However, you may need to verify or provide the following:
- Sign-on URL: Enter the URL: https://gagelist.net
- Reply URL (Redirect URI): This is pre-configured for gallery apps, but ensure it matches the redirect URI: https://login.microsoftonline.com/common/oauth2/nativeclient
- Click Save to apply the SSO configuration.
- If prompted to “Test single sign-on,” you can skip this for now, we can test it later after assigning users.
Step 5: Assign Users and Groups to the Application
- Back on the application’s overview page, click Users and groups in the left-hand menu.
- Click the + Add user/group button at the top.
- In the Add Assignment pane:
- Under Users and groups, click None Selected, then search for and select the users or groups in your organization who should have access to GageList.
- Under Select a role, leave it as the default (typically “User”) unless our app requires specific roles (check our documentation or contact support if unsure).
- Click Assign to grant access to the selected users or groups.
- Only assigned users will be able to sign in via SSO.
Step 6: (Optional) Consent to Permissions
- Since GageList is multi-tenant, the first time a user signs in, they may be prompted to consent to the permissions our app requests (e.g., accessing their profile or email).
- To avoid this prompt for all users, you can grant admin consent on behalf of your organization:
- Go to the application’s overview page in Enterprise applications.
- Click Permissions in the left-hand menu.
- Click Grant admin consent for [Your Tenant Name] and confirm the action.
- This ensures a seamless SSO experience without individual consent prompts.
Step 7: Test the SSO Configuration
- Open a new browser window (preferably in private/incognito mode to avoid cached credentials).
- Navigate to the Microsoft My Apps portal: [https://myapps.microsoft.com](https://myapps.microsoft.com).
- Sign in with a test user account that you assigned in Step 5.
- Locate the tile for GageList and click it.
- If SSO is working correctly, you’ll be redirected to the GageList dashboard.
- If you encounter issues (e.g., login failures), double-check the Reply URL, assigned users, and contact our support team with any error messages.
Step 8: Share Access Instructions with Your Users
- Inform your assigned users that they can access our SaaS product via:
- The Microsoft My Apps portal (https://myapps.microsoft.com).
- Directly via GageList.net, where they’ll be redirected to sign in with their Azure Entra ID credentials.
- Let them know they should use their existing company credentials (e.g., `user@yourdomain.com`) for SSO.
Troubleshooting Tips
- SSO Fails: Ensure the Reply URL matches what we’ve specified and that users are assigned correctly.
- Users See Consent Prompt: Grant admin consent (Step 6) or ensure the app’s permissions align with your policies.
- Need Help?: Contact our support team at support@gagelist.com with your tenant ID (found under Microsoft Entra ID > Overview) and any error details.
That’s it! Your Azure Entra ID is now configured to use OAuth 2.0 and OpenID Connect for SSO with our SaaS product. Your users can log in seamlessly with their existing credentials, and you’re ready to take full advantage of our platform. If you have any questions or need further assistance, feel free to reach out to us!
Method 2: Setting up GageList as a new registered application in your tenant
Prerequisites
- Azure Portal with a Global Admin role.
- Users are set up in Entra ID (Azure AD). These would be internal users synced from your local AD or users set up on the cloud.
- A GageList account for adding users that will be accessing gagelist.net.
Summary
This guide explains how to set up secure and seamless login for GageList using modern authentication technologies: OpenID Connect (OIDC) and OAuth 2.0. These methods make it easier and safer for users to access the platform without needing to remember multiple passwords or share sensitive information.
- What is OAuth 2.0?
OAuth 2.0 is like a key that allows GageList to access certain information or services on your behalf, such as verifying that you’re allowed to log in. - What is OIDC?
OpenID Connect (OIDC) works alongside OAuth 2.0 to confirm who you are. It ensures that when you log in, the system knows it’s really you and not someone else. - Why Use OIDC and OAuth 2.0?
- Easy Login: You can sign in using your Microsoft account (or other supported accounts) with just a few clicks.
- Better Security: Your identity is verified without sharing passwords directly, making it safer to log in.
- Simplified Management: Organizations can easily manage who has access to GageList without a lot of manual setup.
By using OIDC and OAuth 2.0, GageList makes logging in simple and secure, giving users confidence while reducing administrative hassle for businesses.
Registering GageList as an Entra ID Application
This will add an application in Entra ID for GageList and requires that you have Global Administrator access to your company’s Azure tenant.
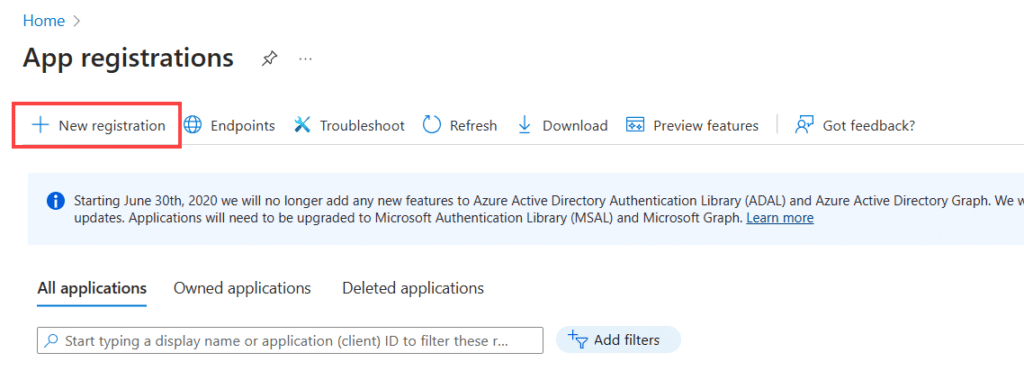
On the Azure Entra ID page, select “App Registrations” in the menu and click “New registration” to create a new application.
Name the new application “GageList” and click Register to create the application.

Add “Redirect URIs” (websites) which will be required to authenticate with Entra ID.
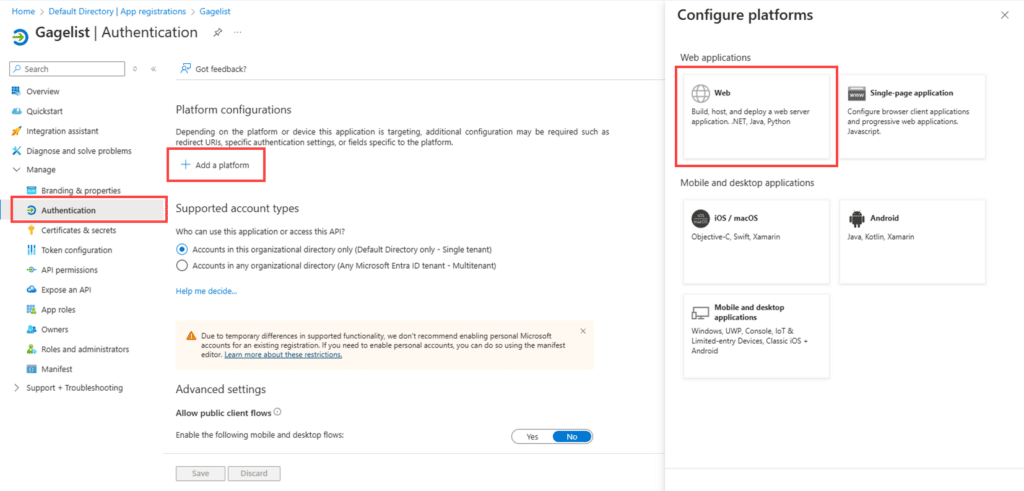
Choose Authentication > Platform configurations: + Add platform > Web
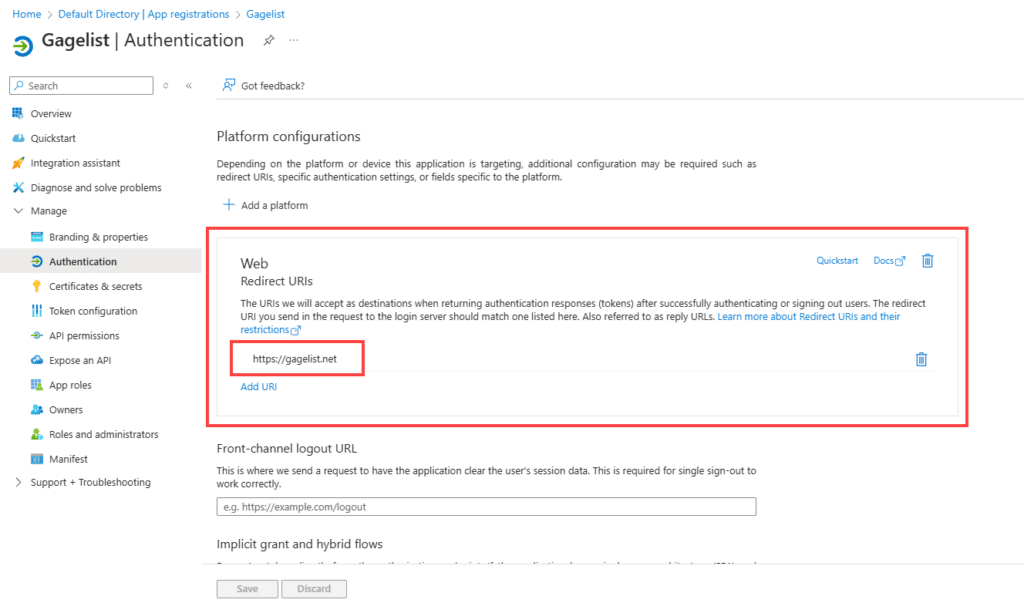
Add the redirect URL gagelist.net and click Configure to save.

Once saved, you will see web redirect URL as shown below.
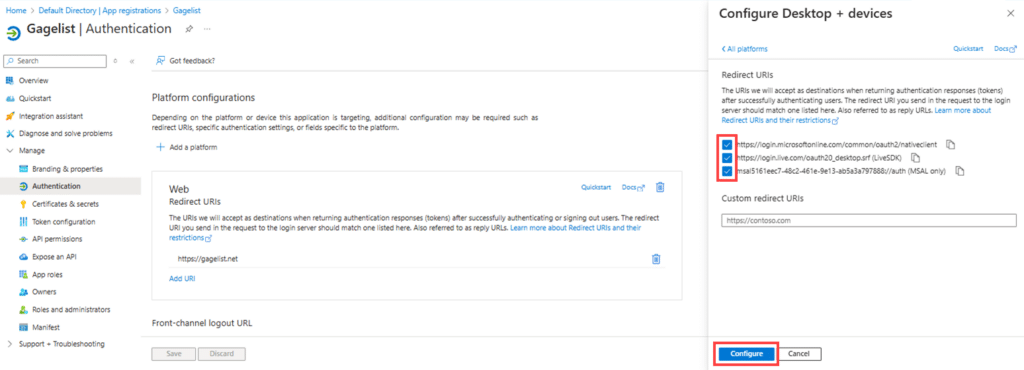
Similarly, to add Mobile and Desktop URLs, choose Authentication > Platform configurations: + Add platform > Mobile and desktop applications.

The below URLs are automatically created. Enable the checkboxes and click Configure to save changes.
https://login.microsoftonline.com/common/oauth2/nativeclient
https://login.live.com/oauth20_desktop.srf
msal53c79bb2-9feb-4b87-9e8e-0c3b2ff7598c://auth
You should now have both authentication methods configured.

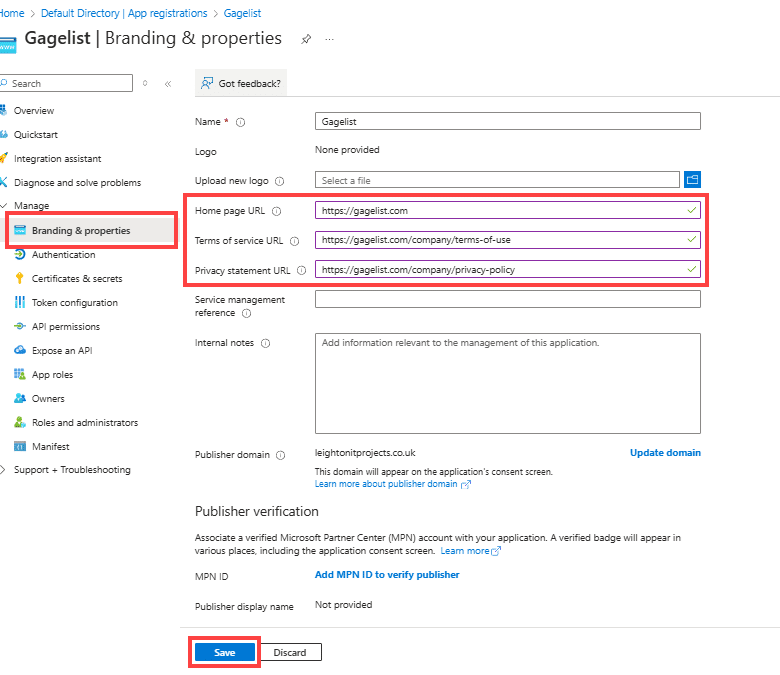
Navigate to Branding & Properties and add the below URLs, then click Save.
https://gagelist.com/company/terms-of-use
https://gagelist.com/company/privacy-policy
Setup OIDC Settings
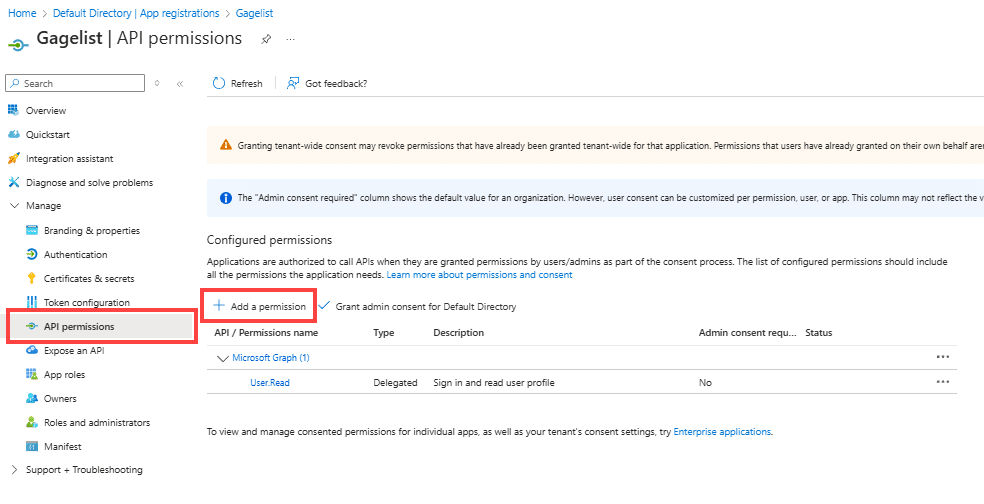
Go to API Permissions and click Add a permission.
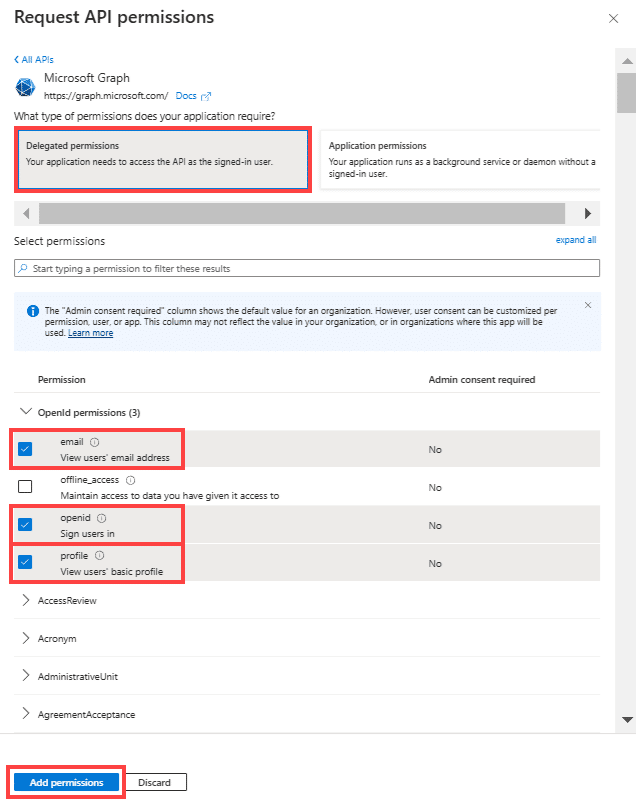
Select “Delegated permissions” and check the boxes to add the below permissions to the app:
- openid
- profile
Click “Add Permissions” to save changes.
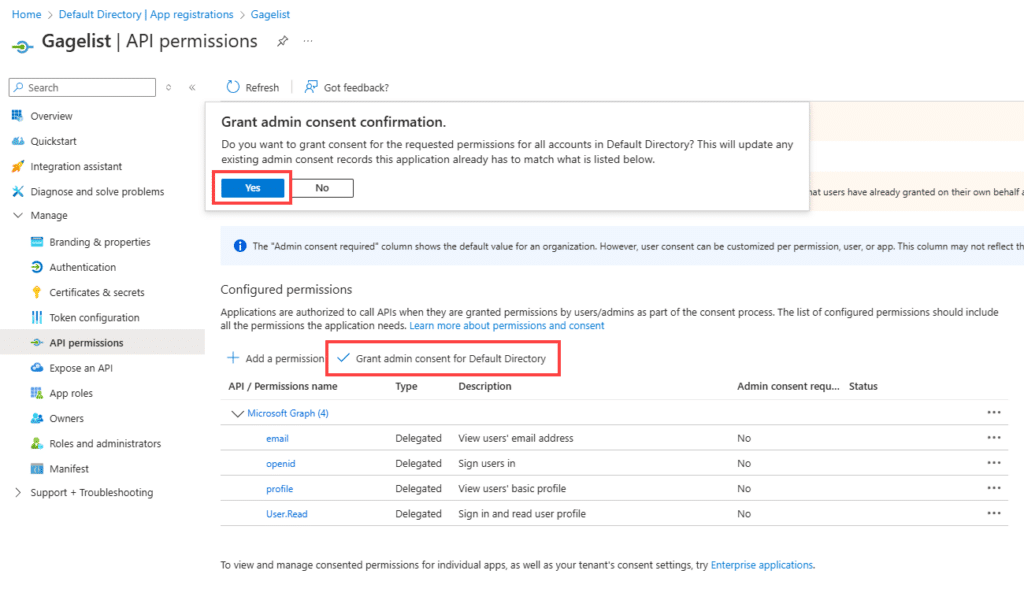
Click “Grant admin consent” and Yes.
This will create a default Enterprise app. Before logging in and approving the GageList app, you can delete it since it’s not a requirement, to avoid confusion later on.
Click to open the default Enterprise app and select Properties then Delete.

At this point, we can test SSO from GageList. Visit gagelist.net and click “Sign in with Microsoft”. This will redirect to a Microsoft login page.

Once you are signed in, it will initially prompt for allowing permissions.
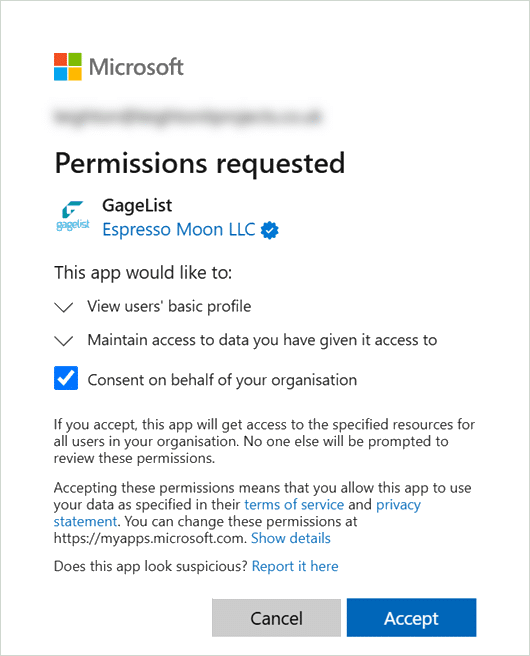
Once accepted, it should redirect back to gagelist.net and, if authorized, log into your GageList account.
Note: If you haven’t registered with GageList, you will be redirected to the registration page to make an account.
If the email address used to make the user login for gagelist.net matches the one in your Entra ID (with provided authorization), you will be granted access to the associated GageList account.