
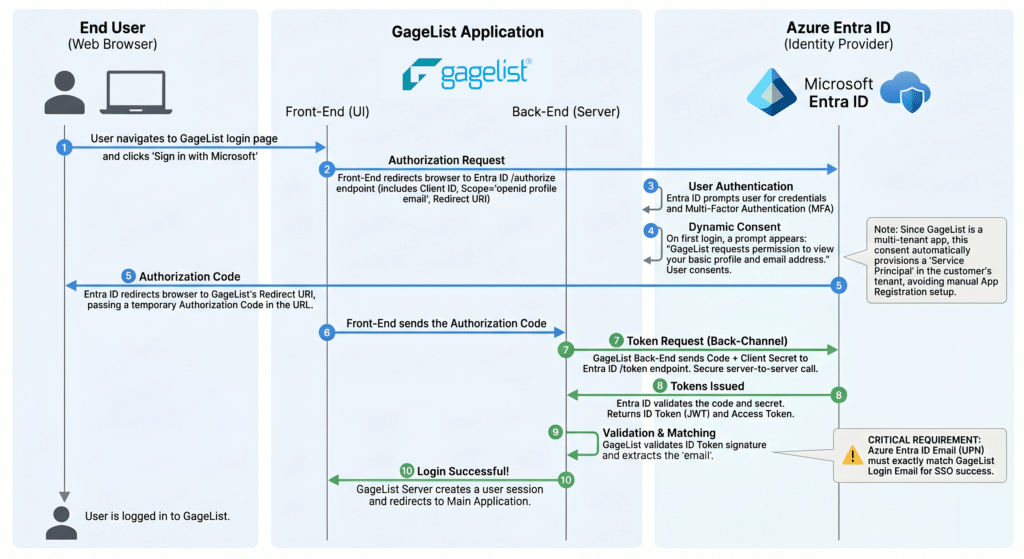
GageList makes logging in simple and secure by supporting Microsoft Single Sign-On (SSO). Instead of managing a separate username and password specifically for GageList, your team can securely access their accounts using their existing Microsoft work credentials. This means one less password for your users to remember, while allowing your IT department to seamlessly enforce your organization’s centralized security policies.
Prerequisite: IT Setup
Before configuring SSO in GageList, please ensure that your IT department has already set up your team members in your organization’s Microsoft environment (Azure Entra ID).
Because GageList is fully integrated with Microsoft, there is no complicated IT setup or custom application registration required. As long as your users have active Microsoft accounts, you are ready to begin.
Enforcing SSO for Users (For Account Administrators)
To enable a user to log in via SSO, a GageList Account Administrator must add them to the account and require SSO authentication.
- Navigate to User Management: Log in to your GageList account as an administrator and click User Management (found under the user icon at the top-right).
- Add a New User: Click the Add User button and fill the form fields.
Important: The email address you enter here must be an exact match with the user’s Microsoft work email address. - Enforce SSO: Select the Single Sign-On checkbox. Enabling this setting ensures the user cannot create a standard password and must use their Microsoft credentials to access GageList.
- Save: Click Save to complete the setup.
How Users Sign In
Once an administrator has set up a user’s account with SSO enforced, logging in is simple:
- Navigate to the Login Page: Go to the GageList.net login page.
- Click “Sign in with Microsoft”: Instead of using the email and password fields, click the Sign in with Microsoft button. You will be securely redirected to Microsoft’s login portal.
- Authenticate: Log in using your company credentials.
- Grant Permission (First-Time Only): If this is your first time using SSO with GageList, Microsoft will prompt you to grant GageList permission to view your basic profile information (like your name and email address). Click Accept.
- Access GageList: Once Microsoft verifies your identity, you will be automatically redirected back to GageList and logged into your account. From now on, you can simply click the Microsoft button for instant access.